The Oddball Quill Gordon was devised by a nameless man, who fishes the lower Cheeseman canyon section of the South Platte River. The only place I know that this fly is talked about is in Ed Engles book "Tying small flies". Which is one of my favorites. In the book, Ed tells a story about fishing a bwo hatch, and how, like me the other day, couldn't get a trout to take the go to standards. He goes on to say how he had saw this man before and how on this day, he was catching trout left and right. Ed mustered up the courage and asked the gentleman what he was using. The man handed Ed the oddball quill gordon. in a size 18. Ed describes how he fished the fly, just like the old gentlemen did, Down and across to the rising trout. Ed was quickly into fish. If you dont own tying small flies by Ed Engle, you should. Its a great book.
If you read my winter session 29 fishing report, I had a situation just like in the book. Except I was the one with the oddball, fishing it down and across. I was getting fish left and right, and I talked to an older gentlemen and I told and showed him the oddball quill gordon. Funny how things go down sometimes.
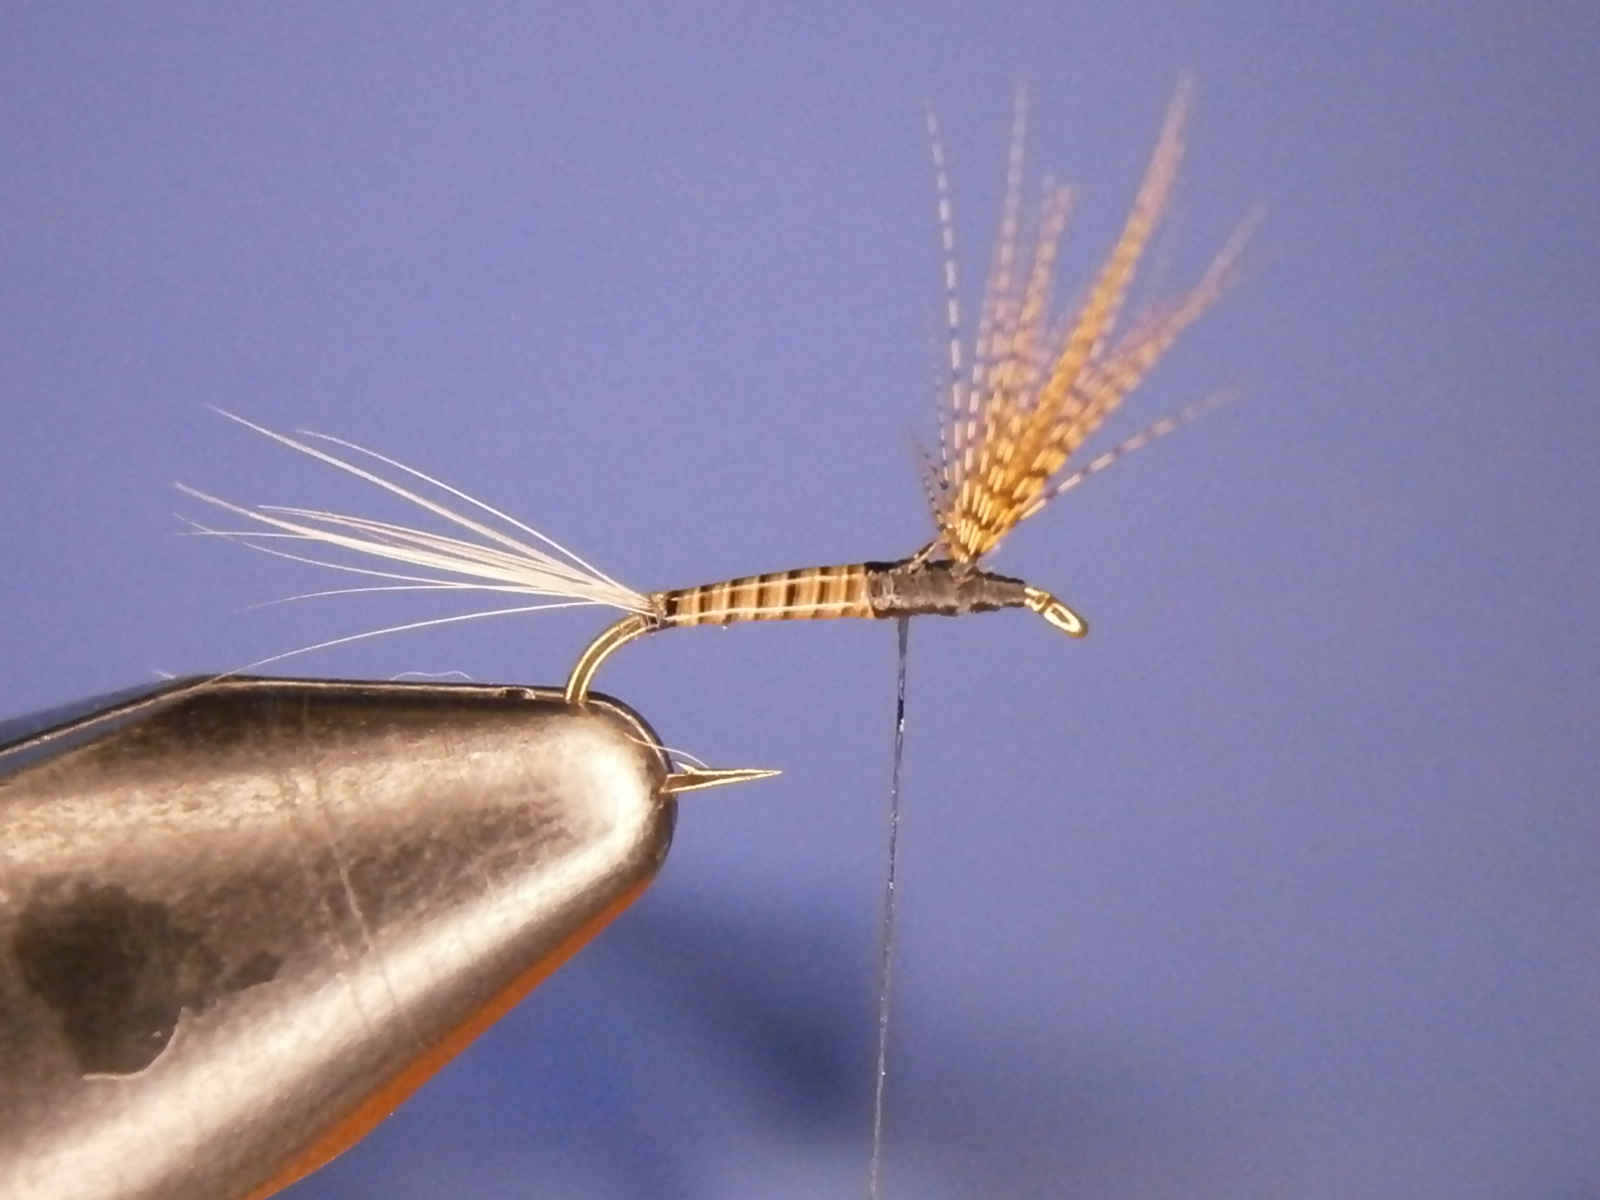
Without a doubt this fly should be in your box, Its a great fly that works on small mayfly hatches. Its a wonderful variation to the famous, and fabled Quill Gordon. I agree with Engle that when this fly is fished down and across, giving it a twitch, drag, dead drift is the ticket. If you watch baetis hatch you will notice that they flop around in attempt to dry there wings for flight.(many mayfly species do this) The trout key in on this action. When the fly goes dead drift to regain its energy, gulp. (click read more)
Lets twist one up!
Materials
Hook- Daiichi 1170 16-20
Thread- Black Montana fly co thread 8/0
Tail- Light blue dun
Wing- Wood-duck flank or equivalent.
Abdomen- Stripped peacock quill
Thorax- Peacock hurl
Hackle- Light blue dun(slightly over sized)
Start the thread and run it half way down then half that distance back up.
Select a well marked wood-duck feather and strip off all the fluff at the bottom and cut the tip of the feather out.(save it, you can use it for some nymph tails!)
Tie the stem in on top with three loose turns.
Pull on the stem of the feather and draw the tip in. Keep everything on top as you pull. Dont worry if your thread wraps move on you, it will happen. Pull them to they are the same length as the hook shank. Then take a couple of tight wraps over your loose wraps, winding your wraps up to the wing.
Divided the wings. Take your fingers and thumbs and pull and tease at each side till they separate. This will be easily accomplished since the feather was divided when tied in. Once they are divided, take two figure 8 wraps in between then. Then take two loose around the base of each wing, be sure to use anchoring wraps after each wing. You can and i recommend a wee touch of head cement in between the wings. This will keep them separated and it will stop them from falling forward later.
Cut the butt of the feather on an angle. This is very important for getting the abdomen taper.
Wrap the thread back to the barb, make nice even touching turns tying in the butt of the feather on the way down.
Take a bunch of hackle fibers and tie them in to form the tail. I like to take one turn and one under, then one right in front of the first turn.
Tie in the stripped peacock quill, I like doing by the tip, as it will give the ribbed effect even more taper. Tie it in on the way back up, be sure to make nice even touching turns to keep the body smooth and maintain the taper. Stop the thread back from the wing by about 2-3 hook eyes length
Wind the hurl up, touching turns, nice and tight. Tie it off and clip the butt.
This step is optional, but i recommend it for durability. Lacquer the quill. I like to use bug bond thin. Its light weight and its durable. You also can spread it extremely thin. A quick hit of the u.v. light and your ready to keep on tying. You can use head cement, just be sure to wait till dries before you carry on.
Tie in the hackle and the peacock hurl. Just one hurl is all that's needed. Pick on from close to the eye.
Wind the peaock hurl touching turns up to the wing, take a full turn of hurl behind the wing then tie it off behind the wing.
Wind the hackle up, two turns is all that's needed. Tie it off behind the eye. (dont worry it will still float fine without any hackle in front of the wing.)
Whip finish and give the head a touch of cement. You want this fly durable, its gonna catch you plenty of fish!.


Next time i tie I'll definitely be tying some of these, Looks like a good fly to me!
ReplyDeleteBlake,
DeleteHey thanks for the comment and good luck with the fly.
Wonderful fly.
ReplyDeleteVery precise. Well done.
Thank you Alan. Twist some up, they work very well.
DeleteAnother great video !!! Johnny did you get my reply to your PM ?
ReplyDeleteBria n,
DeleteThank you, Nope didnt get it, somethings going on with that site.